
At the last CES in Las Vegas, we were very surprised to discover the Ecoflow Blade, a futuristic robot lawn mower. This was surprising because Ecoflow was previously known primarily for its portable batteries. But if there's one area where this manufacturer excels, it's in innovation, as we saw during the Delta 2 battery test, for example. More than just a battery, the manufacturer has created an extremely well-thought-out software package. These innovative ideas are welcome in a field where robot lawn mowers are somewhat stuck in their tracks. And frankly, the Ecoflow Blade doesn't disappoint! Let's find out more in this comprehensive review… Unboxing the Ecoflow Blade Robot For this review, I received the Ecoflow Blade robot, as well as its “Lawn Sweeper Kit,” designed to collect leaves. An accessory that makes this robot the first in the world to collect leaves. The latter can be purchased separately, or in a complete kit, which is a little less expensive.First impression: while the box is bulky, it's also very heavy! I think this is the heaviest robotic lawnmower I've ever tested! And for good reason: the robot alone already weighs 16 kg!A small detail: the 3-year warranty + 1 year, simply by registering on the Ecoflow website. A plus for such equipment, especially since Ecoflow's after-sales service has already proven itself on previous products.Inside, everything is very well organized and protected. The whole thing feels “high-end” because it's so clean and well-presented. Even the small pegs for holding the cables are perfectly tucked into place. It's beautiful! Once unpacked, you'll find a very complete kit: the Blade robot, of course, its charging station, the power supply, the various antenna stake components, mounting screws for the station, stakes to hold the cables to the ground, the cables, and even a set of screws and replacement blades.
Design is a matter of taste; you either like it or you don't. But whatever the case, the design of this robot mower will leave no one indifferent! It looks like a sort of futuristic mini all-terrain quad. Personally, I love it! Nothing like the robot mowers we're used to seeing, resembling large beetles. Ecoflow clearly marks a turning point in this regard already :p
Another striking detail: the front wheels. Much larger than what we're used to seeing (20cm in diameter), but especially positioned at a 45° angle. We can clearly see the wheel alignment here:

Obviously, one might wonder how the robot will move forward with the wheels positioned like this, perhaps even damaging the lawn. There have been numerous debates on social media about this, with many people calling themselves engineers without even having had the opportunity to see this robot in action… These wheels are omnidirectional wheels; they are composed of numerous small wheels integrated into the main wheel, allowing the robot to move in any direction. This type of wheel has long been used in robotics, as can be seen in this video from 12 years ago. This omnidirectional wheel technology is being studied for many fields, from industry to people with reduced mobility, for example. This video explains a little about how it works:

https://www.youtube.com/watch?v=o-j9TReI1aQ I still have a remote-controlled robot mower released about ten years ago equipped with these types of wheels. Placed at this angle, they allow the robot to overcome obstacles up to 4 cm thick, and most importantly, to avoid getting stuck. Compared to the tiny front wheels on most robot mowers, which can block the robot at the slightest hole, these wheels are a big advantage for me.At the rear, we also have large wheels, more traditional, but still equipped with “studs” to provide good grip, especially on slopes (up to 28°).

On the side of the robot, you can see two arms positioned on either side of the robot: these are actually the deck adjustment system. The cutting height is adjusted directly in the app (from 2 to 8 cm thick), and this is the mechanism that automatically moves the cutting deck. This is practical, as many models require mechanical intervention on the robot itself to adjust the cutting height.

While we're on the subject of the cutting deck, here's a view from below:

This is the same type of deck usually used on robot mowers. Three small, razor-sharp blades perform mulching operations, covering a width of 26 cm.


Mulching is a technique that involves cutting the grass into very fine pieces, which nourish the soil and thus help the lawn grow more beautiful. It also has the major advantage of not requiring collection of the clippings. On the downside, it does require regular mowing, but since the robot does the work, that's not a problem!

At the front, still on the underside, you can see the charging connectors:

On the back of the robot is a large red “Stop” button. This is a classic feature on this type of device (and probably even mandatory). It's a sharp device, and a large, clearly visible button allows you to stop everything at the slightest problem. Well, rest assured, I've never had to use it in a month of use. Below it are the start button, the button to start work, and finally the one to return to the station.

Note that the rear axle is articulated: the entire rear axle can pivot to adapt to the terrain. The visible bar at the rear also makes it easier to handle if it needs to be moved. Well, we avoid this as much as possible, because the Ecoflow Blade is quite heavy! The rear is also designed to accommodate accessories, such as the collection basket, which we'll see later, or an auxiliary battery for very large areas if there's no outlet nearby. The front contains all the sensors needed for its movement, including X-Vision technology. The Ecoflow Blade incorporates a whole host of sensors for intelligent movement: visual sensors, LiDAR, and real-time kinematic (RTK) positioning to intelligently recognize and avoid any obstacle, from garden furniture to flower beds.As a result, there's no need for a bumper like on all robot lawnmowers; it becomes unnecessary thanks to obstacle detection. This gives this robot a completely different look! Among other important elements, let's mention the GNSS antenna, which will allow the robot to locate itself in its work area using GPS data. It eliminates the need for a perimeter cable. Next comes the charging station, where the robot will park once its work is done. This station has two charging contacts and a light strip to indicate the robot's status.
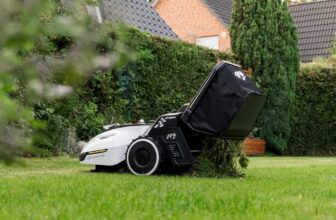
With this Ecoflow Blade, a surprising basket is released, which can be purchased as an option (or as a kit with the robot):
This basket is made up of two parts:

On one side, we have a fabric and plastic collection basket, quite similar to what you might find on a traditional lawnmower:

And on the other, a motorized module with a brush system:

This system isn't there to collect grass clippings, since the robot sticks to the mulching model. This basket is actually there to collect leaves and twigs that have fallen on the grass, so you always have a clean lawn! A first, according to the manufacturer! The two parts assemble to form a leaf collection basket:

Now let's move on to installation…
Installing the Ecoflow Blade robot

Installation is done using the Ecoflow app, which we already discovered during our Delta 2 battery test. The manufacturer seems to be trying to create a true ecosystem by bringing everything together within the same app. This is actually a good thing!

Once the robot is turned on, it is automatically detected by the app, thanks to its integrated Bluetooth. Then the three-step installation phase begins.
The app explains step by step how to assemble the antenna and connect the various cables: Assembling the antenna is very simple, with all the cables marked with a letter and number code, and even a color code. You'd have to do it on purpose to make a mistake. The connectors are screwed on, and everything is, of course, moisture-proof. The two antenna tubes are then assembled, passing the cable through, the antenna through the top, and then the base, fitted with spikes to plant it in the ground. Be careful, the spikes are very sharp! Once the antenna is assembled and connected to the charging station, which is itself connected to the power supply, we move on to step two: positioning the antenna. A short video explains how to do this. This is also very simple, as long as you follow a few guidelines, such as positioning it more than 2 meters from a building or large trees, so that the signal can pass through properly. Here, we use a GPS signal, with the usual constraints associated with this technology.

The app then displays the signal strength live. Simply walk around with the antenna in different locations until you get a good signal. Once found, all that's left is to plant the antenna in that location. The app then offers a quick tutorial to learn how to control the Ecoflow Blade from your smartphone. It's really very simple, since it's controlled with just one thumb, via a joystick displayed on the screen:
We'll then search for the best location for the charging station, which must be sufficiently covered by the antenna signal. Simply direct the robot to where we want to place the station, until the app displays a good signal.

Conveniently, the station doesn't need to be located in the area to be mowed. During my first test, it was even 4-5 meters from the area: the robot will find its way to the mowing area on its own, after having it do it once.

Once the right location is found, we can set up the station. Here again, the app explains everything in detail:

All you need to do is use the large plastic screws provided to secure the station to the ground, mainly to prevent it from moving when the robot parks there. We organize the cables if necessary, and we secure them to the ground if necessary to avoid having cables wandering around. The manufacturer has provided several small stakes for this purpose.

Our installation is complete! Here, in the great outdoors (recreational area), there's no problem receiving the signal, even with the many trees, so the antenna is close to the station. However, the manufacturer provides cables several meters long, allowing the antenna and power supply to be easily relocated if necessary.

The robot can then begin charging. A green light confirms proper operation. Third and final step: mapping. This is an important step, since it's thanks to mapping that the Ecoflow Blade will know where to work and where to stop. The app provides a few recommendations before starting mapping: no obstacles in the area (toys, branches, animals), and a lawn no more than 8 cm high. This last point is important because if the grass is too high, the robot will tend to consider it an obstacle and will therefore change course. If the grass is too high, it will therefore be necessary to mow it first. The application checks several points before launching the mapping, including the antenna signal strength and the robot's battery level. Three short animations then explain how the mapping works.

First, we have the work zone: we'll control the robot using the joystick to make it navigate around the area. It's possible to add multiple work zones if we have several areas to mow.

We can then create no-go zones, where the robot should not enter. Here again, we control it with our smartphone to make it navigate around the area to avoid.

Next, if we have multiple mowing zones, we'll need to create a channel between each one. Still using the same principle, we can control the robot remotely to move it from one zone to another.


Once the mapping is complete, the installation is complete: you can start mowing immediately.
The installation is therefore very quick. While installing a robotic lawnmower with a perimeter wire can sometimes take up to two days depending on the complexity of the terrain, here it will take a maximum of an hour (always depending on the complexity of the terrain, of course). And above all, it's possible to very easily manage multiple mowing zones, whereas a perimeter wire would be a real challenge to plan for.


Another significant advantage: if the wife decides to create a new flowerbed, or if we install a trampoline, for example, there's no need to reinstall the perimeter wire. Adding an avoid zone, or even completely rebuilding the map, only takes a few minutes.
Time to get started!
Using the Ecoflow Blade Robot
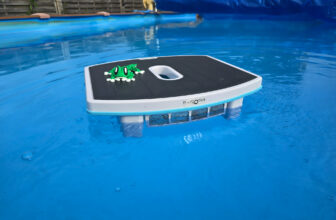
I tested this robotic lawnmower on two very different terrains over several weeks. The first: my recreational area, which has many trees, isn't particularly flat, and above all, has no electricity, let alone internet. The Ecoflow Blade was therefore connected to an Ecoflow battery, which was itself connected to a solar panel:

A small group gathered for the photo, the solar panel being obviously better positioned for use.

Using the Ecoflow Blade on this type of land is made possible by the fact that it integrates a 4G eSIM. It can therefore do without Wi-Fi. This is practical on very large plots, second homes, or isolated plots like this one. It also integrates a GPS, for positioning, of course, but also to combat theft: between the GPS and the eSIM, it is possible to locate the robot in 2 seconds via the app.

Paired with a battery (Ecoflow or other, for that matter), this robot mower can be used anywhere. It reflects the brand's “nomadic” side ;-)


On this plot, I created a small map of a grassy area, of course. As you can see, the station is off-center from the work area, and that's absolutely no problem.

The second plot is, of course, my main home. While the plot is a little flatter and has Wi-Fi coverage and a power supply, its layout is a bit more complicated, with a narrow passage (about 1.5m) and, above all, two distinct zones. You can see them on the map, as well as the orange passage that connects them:

The app displays the area to be mowed (approximate), the progress level, and the work time. The robot's path appears in white for work already completed. As you can see, the robot follows a Z-shaped pattern, not a random mowing pattern like some others. While you can start the robot by pressing its button, the most convenient way is, of course, to activate it from the app. The best part is programming it: you can set the working days and times, as well as the areas to be mowed if you have several, as well as the cutting height and speed.
Another programming mode is timed use: here, you simply tell it that it can work for x hours each day, and it handles the rest.

The settings allow you to adjust the operation, such as setting the mowing time for edges after work is finished, or even delaying the start after rain, as the robot has a rain sensor.

Once programmed, the Ecoflow Blade does its thing completely by itself: it starts working at the specified times, then automatically returns to recharge, waiting for its next work session.

The job is perfect:
Despite the option to mow the edges, the robot still leaves a border in certain areas that will need to be trimmed with the edger from time to time. This is probably due to its obstacle detection, which prevents it from getting too close to obstacles, thus leaving an unmowed area. This gap could be reduced a bit, but the manufacturer is gradually refining the robot's operation, with several updates having been made since I've had it. This is the difference with a traditional robot, which stupidly follows its perimeter wire no matter what as long as it can move forward.

But aside from this detail, the Ecoflow Blade is much smarter than all the perimeter wire robots I've tested. Here, for example, I haven't declared any obstacles in this area; the robot detects them in real time and avoids them. Laundry net posts and flower pot in the middle of the lawn:


Whether it's a toy, a garden hose, a forgotten tool, a dog, etc., the robot detects them perfectly and adjusts its path in real time. And the result is quite impressive, since it mows here in 1.5 hours what my

Husqvarna Automower 305

did in 5 hours (not to mention that it couldn't get to the second area in front of the house). It's fast, clean, and efficient, even more so than the

Segway Navimow
model we recently tested, equipped with a camera and AI, which sometimes spent long periods “thinking.”

No more blockages thanks to the robot's large omnidirectional wheels. A mole hole, or a dog scratching the lawn, no longer blocks the robot; it truly goes everywhere. In fact, it climbs a concrete path that protrudes a good 3 centimeters to reach the second work area. The only slight problem: twigs can get stuck in the small front wheels. They'll need to be cleaned from time to time. But if you have a clean lawn, no problem. Ultimately, these wheels significantly improve efficiency. It remains to be seen how this will affect the long-term potential wear of the wheels.

In terms of battery life, the 298Wh lithium-ion battery provides 4 hours of battery life on a single charge, enough to mow approximately 1200m². The robot then returns to recharge (130 minutes for a full charge) and resumes work where it left off.

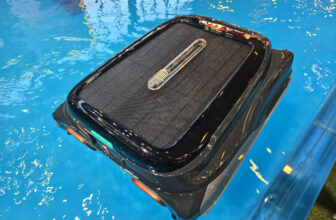
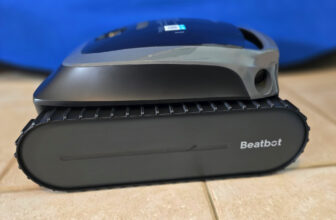
A robot that collects leaves? I was skeptical about the leaf collection module. This module attaches to the back of the Ecoflow Blade and connects to a small socket hidden behind a cover on the back of the robot:
A screw is then tightened to hold the bin in position:

The result is a fairly long assembly, a little less versatile for maneuvering:

And a new function that can be unlocked in the app: it's possible to configure the robot to collect rather than mow. The cutting deck then raises, and the bin's motorized brush goes to work.
The manufacturer has thought things through to the end, since it's even possible to program leaf collection as well, the option being available in the programming:
Since the Ecoflow Blade is quick to do its job, it's easy to imagine programming it to collect leaves in the fall, then scheduling a second pass this time to mow, which allows for a consistently clean lawn.
And it must be said that it does its collection job quite well:

Here too, the result is quite impressive! However, you'll have to manually empty the bin from time to time.
Conclusion
I was eagerly awaiting this robot lawn mower, without really knowing what to expect. On the one hand, we have a manufacturer entering a completely new field, and one that might not have mastered it at all. On the other hand, this same manufacturer has shown through its previous products that it knows how to innovate with cutting-edge, highly well-designed products, both in terms of hardware and software. So, we could expect a high-performance and innovative robot lawn mower. And that's exactly what Ecoflow offers us here with its Blade. The robot proved dynamic and efficient in all my tests, leaving a perfectly mowed lawn, and in record time. It's simply the fastest I've had the opportunity to test. Of course, the robot works all by itself, and whether it takes 1 hour or 6 hours is not really a problem. But here it allows it, for example, to work from 10 a.m. (to pass over a dry lawn, without morning dew), while having finished its task by noon, which leaves the garden free in the afternoon to enjoy it without having a robot in its legs. This speed ultimately proves to be very appreciable :)

Of course, its obstacle detection is a considerable asset. First of all, its mapping, which allows for ultra-fast installation without having to run a perimeter wire. Having used both types of robots, the result is clear: being able to do without a perimeter wire is a comfort that's hard to express! Not to mention the ability to manage several distinct zones very easily. Its X-Vision technology also allows it to avoid anything lying around in the garden, whether it's a toy, a tool, a bicycle, etc. Whereas a traditional robot sometimes leaves an object littered with blades… Be careful, however, not to use it at night to protect small nocturnal creatures like hedgehogs. While its sensors should allow the robot to avoid them, these little creatures still need to live a little peacefully ;-)

Finally, if I had been skeptical about the leaf collection, I must admit that the system is once again well thought out and effective! Of course, this isn't a collector that will be very useful in the summer, but it could make life easier in the fall. I'll probably come back to it then, as the tests were done here with a pile of leaves brought in from the woods :p

In short, I love this robot lawnmower, from its design to its features and efficiency. The only issue that remains is the price. It costs €2,999 for the robot alone. The collection box, on the other hand, is sold separately for €799.

A kit that combines the two allows for a small saving, since it sells for €3,699. Other kits also include a battery and solar panel depending on your needs. At nearly €3,000, the price may seem excessive. But in comparison, a Husqvarna 415x model
, for example, is sold for €2649. Not far from our Blade. Except that it requires the installation of a perimeter wire, does not have all the intelligence of the Blade, and is “only” intended for 1500m2. The Blade, on the other hand, is designed for plots of land twice that size. The difference is mainly in the marketing strategy: while competitors offer variants for 500, 800, 1000, 1500m2, etc., Ecoflow only offers one capable of doing everything. If you have a “small” plot of land of less than 1000 / 1500m2, the Blade will indeed be expensive given the surface area to be mowed, where it will be possible to find models for less than €1000 from the competition (with perimeter wire however). But for plots beyond that, Ecoflow offers a price in line with what other manufacturers offer. However, it's a much smarter and more practical model. I approve!

For distribution, it's available both on the official Ecoflow website and on Amazon.

Note that it's benefiting from a superb 29% discount until April 11, 2024, thanks to the code EFBLADESPRING5, which brings it down to just €2,136. Offer valid only on the manufacturer's website.


Please remain courteous: a hello and a thank you cost nothing! We're here to exchange ideas in a constructive way. Trolls will be deleted.