
Two years ago, I installed my first solar station: Beem Energy. A solution designed by a French company with a tantalizing promise: a solar panel to place on the ground, an electrical outlet to plug in, and in 15 minutes you'll be producing electricity, which is directly deducted from your electricity bill! No major work required, and no need to hire a professional. Two years later, the conclusion is clear: it works! So well that a year later, I also installed an extension to double my solar production. Since then, solutions of this type have multiplied and the technology has evolved. Beem has thus upgraded its kit to align with the competition, now offering a Beem 420W kit instead of the original 300W! How is it installed? How does it work? How profitable is it? Let's take a closer look…
Presentation of the Beem 420W solar kit
Receiving the Beem 420W solar kit was quite surprising, as it came in a fairly compact box weighing around 30 kilos. Compact, given that its 90cm sides are relatively short considering it contains solar panels. You can almost carry the box alone, whereas competitors offer single-piece panels that arrive on a pallet by carrier. Here, the box fits in the trunk of a car.

Inside, we find a very complete kit: 4 photovoltaic panels, an MC4 cable, 4 brackets with their mounting screws and anchors, a microinverter, the “Beembox,” which we'll discuss later, instructions, and 4 assembly templates. The package is compact because the manufacturer uses 4 small solar panels here rather than one large 420W panel, as is the case with all competitors.

These panels measure 80cm on each side and are 2.5cm thick. They're 10cm longer than the previous version to provide more power (going from 300Wp to 420Wp). They're available with an all-black face, or a more decorative, leaf-shaped face, as seen here. Beem wanted to offer something aesthetically pleasing, and this is one of the things that sets it apart from the competition, which generally offers a single traditional panel.

On the back, you can see the connectors and mounting hardware:

The connectors are very standard, with MC4 connectors like those found on all photovoltaic panels (it's a standard in the field). One connector is for the +, the other for the -, so it's impossible to make a mistake. All of this, of course, is completely waterproof. In the two upper corners are metal brackets, which will allow the panel to be attached to the supports:

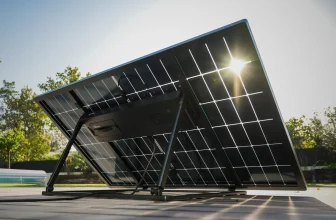
As well as a kickstand system that allows the panel to be oriented 30°, particularly useful in summer when the sun is high in the sky:

For those who are curious, I'll leave you with the technical data sheet visible on the panel. We have four 105W monocrystalline panels, allowing up to 420W, covered with 3.2mm high-transparency tempered glass. They each weigh 6.5kg, which makes them easier to handle, compared to a large panel weighing 30 to 40kg… These photovoltaic panels are rated to retain 80% of their nominal power after 25 years (but they will continue to function well beyond that!).


Next come the “T”-shaped wall mounts. This option will be selected at the time of purchase, as the panels can be wall-mounted or simply placed on the ground using another type of support provided. The top bar of the supports has two “clamps” into which the panels will be clipped. A practical system, patented by the company:

The bottom of the bracket also features the same type of clamp to securely hold the solar panel, whether in a “flat” position or oriented at 30°.

This black box is the 400W microinverter, from Hoymiles (and therefore compatible with the OpenDTU solution seen here): its role is important, since it collects the panels' production and converts it to 230V. It offers an MPPT efficiency of 99.8%, which is excellent. It also synchronizes with the power line so that the panels' production can be consumed by household appliances.

The solar panels will be connected at the bottom, and the output to the Beembox at the top.

After the inverter, the BeemBox will be connected: this will count the electrons to monitor the panels' production. It also has a Wi-Fi connection, which will allow you to view production information in the associated mobile app. No Tuya smart plug here; this BeemBox does all the work. This is a new version of the one we saw on the first kit, which is more compact and now covered by two patents. As you can see, everything is included: the 3m MC4 extension cable, a 10m extension cable, and the screws and anchors, suitable for any type of support (stone, concrete, brick, cinder block).Finally, the templates to help us with installation, which follow the design and size of the solar panels:


On the back, each corner has double-sided adhesive to attach the templates to the wall where the panels will be mounted.


As you can see, everything has been designed to make installation easier! It's time to get to work…

Installing the Beem 420W photovoltaic kit

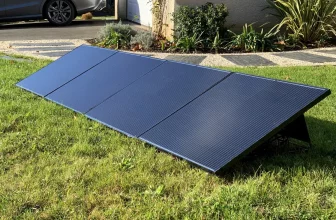
The selected kit is therefore the one that mounts to the wall. The other (simpler) option would have been to opt for the kit that simply sits on the ground. But of course, this takes up a bit of floor space (3m²).

Example of a ground-mounted installation

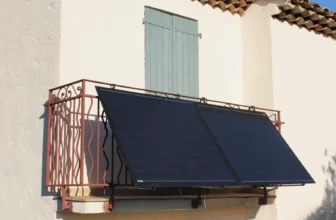
The challenge is finding a spot with the best exposure to the sun, preferably facing south, to benefit from the sun's rays for as long as possible, with a power outlet not too far away (up to 10m). My terrace faces south, but since I already have two other first-generation Beem kits facing south, I chose to place them on the gable end of the house, facing southwest.
This is indeed a viable option when you have several solar stations: rather than exposing them all to the south and having a large production peak in the middle of the day, spreading them out along the path of the sun allows you to smooth out this production peak, thus producing for longer periods of the day. Here, a southwest exposure allows me to start production later, but also to finish it later. We'll see this in more detail on the graphs a little later.
The southwest-facing gable of the house
Depending on the height, you'll need a stepladder, a level, a drill, a tape measure, and a pencil. We start by placing the templates, which can be aligned as shown here in a 4×1 or 2×2 pattern. Despite the fact that this is plaster, the adhesive on the back of the templates sticks very well! I even had to pull it when removing them :p

3 wall plugs and 3 screws per support, and we quickly have the 4 supports installed. Here, I used the provided wall plugs and screws, which are great for fixing them to plaster/cinder block:
Here we are with our four brackets secured, level, and centered on the wall. There will be room on each side if I ever decide to add a set later :)

On the bracket closest to the outlet where the system will be plugged in, screw the inverter into place using the thumbscrew. Be sure to include the rear screw before attaching the bracket, otherwise you'll have to disassemble it again.

All that's left is to attach the solar panels themselves:

They simply clip onto the top clamps of the wall brackets. It takes less than a minute per panel; it's really very simple. Next, the panels can be oriented 30° using the rear stand, which clips onto the lower clamp. This makes it easier to make connections underneath:

The panels are connected in series, that is, to each other. Since each panel has two sockets, simply connect a female socket to the male socket next to it. It's impossible to make a mistake, given the MC4 format of the sockets.
The remaining socket on the panel furthest from the inverter will receive the 3m extension cable so it can be connected to the inverter:
The connection diagram will be easier to understand:


All that's left is to connect the BeemBox cable to the inverter's 230V output.

The cable between the inverter and the Beembox is 10 meters long, which leaves plenty of room for installation. The cable between the Beembox and the electrical outlet, however, is much shorter (about 30 centimeters), so the Beembox will need to be placed near a power outlet. Since the box is waterproof (IP65) and UV-resistant, it can be placed almost anywhere, as long as a power outlet is nearby.
I recovered an electrical connection here from the patio awning…

And here are our 420W Beem panels installed and working!
In my configuration, they will remain oriented at 30° for the time being, which allows me to optimize my production. We'll see in winter if we need to lower them, as the sun is lower during this time of year. The overall effect isn't shocking and remains relatively discreet.

Our panels are now starting to produce, and our nearest appliances are consuming this “free” electricity. I filmed the entire setup of the first kit I installed two years ago. The setup is identical, and you can see that, taking my time, it took me less than an hour to install the entire system:

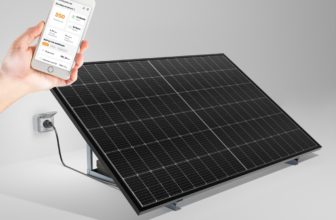
The Beem Energy Mobile App

The app already includes a kit and a 300W extension.

You'll need to enter the serial number visible on the BeemBox, then specify the type of installation: number of panels, postal code, orientation, and position of the panels.

The app then connects to the Wi-Fi network created by the BeemBox to configure it. All that's left is to select your Wi-Fi network and enter its code, so the BeemBox can connect to the internet.
And this time, the installation is completely complete. The home screen will display our live electricity production since the beginning of the month, and the equivalent in devices powered (1 month of smartphone charging, 1 month of internet box, etc.).
The daily production curve allows you to ensure that everything is going well and that the panels are correctly oriented. As you can see here, my southwest-facing panels actually start producing electricity around 1 p.m. but continue until 8 p.m., while my other south-facing panels stop producing much after 5 p.m. But the app goes further than just showing us our production: it also allows us to track our consumption by simply linking it to our Enedis account. It's a good way to raise awareness about it:
This is one of the key selling points of the Beem solution: by combining solar production, which therefore provides free electricity, and by raising users' awareness of their electricity consumption, displaying their actual consumption, and also offering them small challenges to complete, the company estimates that it's possible to save up to €270 per year on your electricity bill (€150 of solar electricity + €120 in savings thanks to simple actions).

Solar panels that plug directly into an electrical outlet? Doesn't plugging a power source into an outlet that's already powered risk tripping the meter? The way they work is surprising and raises many questions, which is entirely legitimate!

In fact, they work based on two things.

First, the inverter synchronizes with the electrical grid to function. You'll need an electronic meter to benefit from this. Not that the old-fashioned disc meter doesn't work, but using them with solar panels is prohibited: technically, it works, but in the event of overproduction, the disc meter starts spinning in the opposite direction, thus decreasing the electricity bill…. This is actually a principle used in Belgium, which is very profitable. But this is France :p Anyway, when you declare your panels, if you still have an old meter, Enedis will automatically replace it.

Anyway. Because of this necessary synchronization with the electrical grid, solar stations of this type don't work in the event of a power outage, and they can't operate in an isolated location that isn't connected to the electrical grid. This is a shame for battery life, but on the other hand, it also prevents you from getting electrocuted if you touch the BeemBox's plug: as long as it isn't synchronized with a power outlet, no current flows.

Then, the system relies on a simple rule of physics: electrons are lazy and always take the shortest path.

In practice, solar panels capture the sun's rays and transform the photons into electrons. The inverter, synchronized to the electrical grid, injects the solar electrons into the home's electrical circuit. The solar electrons diffuse and power the nearest electrical appliances that are consuming electricity at the same time. Thus, for each solar electron produced and consumed by a home appliance, it's an electron from the electrical grid that doesn't pass through the meter, and therefore isn't billed.

In my home, this installation is plugged into an outlet on the terrace, so it probably powers part of my pool pump and the spa, which are the appliances closest to the BeemBox :)

The goal here isn't to produce as much electricity as we consume each day, since that would require a much larger and more expensive installation, especially with batteries for the night. The goal here is to eliminate the “electrical tail” of your home. The electrical limit is the minimum electricity consumption of your home, which is present no matter what, even when no one is home. It corresponds to the consumption of the refrigerator, internet box, home automation box, VMC, appliances on standby, etc. If you don't turn on any specific appliances, and you take a look at your electricity meter, you'll see that it still displays an electricity consumption that easily reaches 400W in general. This is the consumption we're trying to eliminate with the Beem 420W kit. And if your electrical limit is higher, it's possible to multiply the Beem 420W kits (up to 2 per circuit breaker/power line).
And the regulations in all this?
The strength of the Beem 420W solar kit is that it can be installed anywhere, without any complicated formalities. If the panels are installed on the ground or less than 1.80 meters high, no declaration is required at the town hall.
The only thing to do is to declare the installation to Enedis, the company that manages the electricity grid. The declaration is made directly online at
https://connect-racco.enedis.fr/prac-internet/login/
, ideally one week before the kit's installation. However, this doesn't really have any impact, as Enedis doesn't have to intervene in any way, and it's a purely legal formality. The declaration takes less than 10 minutes, especially since Beem Energy provides
a step-by-step guide
that tells you exactly what to declare. And if you really don't want to bother, you can even choose the €15 Zen option when ordering, which delegates the declaration to Beem.
The big question: cost-effectiveness
The question that comes up every time with this type of solution is cost-effectiveness. Because the Beem 420W kit still costs €660 (thanks to our exclusive code BEEM-MD). A price that may seem a bit high when you consider the price of a 400W panel and an inverter. But a panel and an inverter aren't everything: there's the BeemBox technology, as well as the design, allowing these panels to become decorative elements :p It's the only solution I've seen that's as modular as this. Not to mention the service: even if the installation documentation is extremely clear, the team is available to advise you before, during, and after installation. An extremely responsive service, which is worth mentioning (don't expect to get a helping hand from Aliexpress for the panels you have shipped from China…).
Coming back to profitability, I am based near Orléans, and I produced 55.2 kWh in 45 days, an average of 1.22 kWh / day, therefore. A very honest production, especially since the month of August was not really exceptional :p And we know well that solar production is not stable throughout the year, especially in winter, when the sun is lower and the days shorter. In Orléans, statistics indicate that it would be possible to rely on 415kWh per year (be careful, I am not in the optimal configuration, since it is southwest facing). At the rate of €0.2460 per kwh (my
EDF rate in peak hours to date ), this represents a saving of €102/year. Do not hesitate to use these sites to help you calculate your sun exposure and your profitability: JRC Photovoltaic Geographical Information System Sunearthtools Then let's not forget the increase in the cost of electricity each year. We are among the cheapest countries in Europe, but the price of electricity in France should catch up with that of the average of European countries. And we know that
the tariff shield must disappear by the end of 2024
. For 2024 we can therefore count without taking too much risk on the same increases as 2023, namely +15 and +10%, which we will round for simplicity to +25%. The government maintains that no, but if our elected officials were math geniuses, that would be known… Source: The National Energy Mediator

, CREWe can then take into account an increase of 5% / year (yes, I am very optimistic though…):
(2026) third year: 140€ (2027) fourth year: €147(2028) fifth year: €155

Conclusion
- Beem Energy was a little crush for me when I discovered the idea two years ago. Since then, many competitors have emerged. But Beem Energy is the fruit of a French company (based in Nantes), with a really nice team behind it. The kit has also been well thought out, with various wall or ground mounting options, very clear documentation, and a design that changes a little from the rest, and which allows these solar panels to appear as an element of exterior decoration. Despite my choice for a wall installation, the installation was very simple thanks in particular to the patterns and supports provided, and in less than an hour everything was working (with time to take the photos for the article). In short, it really is a kit within everyone's reach.
- The solution also has a really very well-made tracking application. The best of all the solutions I've had the opportunity to test, in fact. Beem has done real work in this area, and has not been satisfied with the poorly designed interface of some Chinese outlet. It’s a real plus!
- So should we invest in such a kit? Although it is impossible to predict the future, one thing is certain: the price of electricity will only increase in the years to come. The profitability of such equipment will therefore only decrease accordingly. I think this quote fits the situation well:
- The best time to start investing was yesterday, the second best time is today, and the worst time is to wait until tomorrow.
- Personally I am convinced, and my electricity bill has already decreased in two years, despite the successive increases that we have undergone.
The kit is sold at the public price of €740 on the official store. But right now you can enjoy a
reduction of
80€, which brings the kit at 660€“Only” thanks to our exclusive code
BEEM-MD ! Profitability will be even faster!Note that the 300W version is still available for sale, and is therefore benefiting from a
great price of only €499!
If you have a small electric heel, this may be the solution that's enough for you!

Kit solaire Beem 420W
Please remain courteous: a hello and a thank you cost nothing! We're here to exchange ideas in a constructive way. Trolls will be deleted.