
I don't know about you, but summer here, between mosquitoes and wasps, is hell! While the mosquito population has drastically decreased thanks to our Biogents mosquito traps, wasps enter the house like a windmill as soon as you open a door or window. Last year, we installed a mosquito net for the bedroom window, so we could sleep peacefully with the window open. With the intense heat this summer, it wasn't just the windows that had to be opened, but also the doors and French windows. This, of course, gave wasps a new way in. But also lizards, which we also have a lot of in Sologne :p So this year, we also switched to a roll-up mosquito net for French doors. Still without any work, and that's what I like about the model I'm showing you today! Introducing the Roll-Up Mosquito Screen for Doors There are many different types of mosquito screen systems available today, ranging in practicality and durability. Very satisfied with the previous window model, I once again relied on our partner ProtectHome, which specializes in security and pest control. Here we have a “comfort” roll-up mosquito screen for doors, designed to be both practical and attractive.The model used here is suitable for doors and French doors up to 160cm wide and 225cm high, which already covers many needs. Of course, the box is a bit bulky upon receipt. It's best to be present for the delivery, as the box measures just over 2.30m :) This model is available in white and charcoal, depending on your needs. Here, I opted for the white model to match the mosquito screens already installed in my home.This is a German product, with all the quality that we know from products from this nation. Moreover, it is guaranteed for 10 years (excluding canvas and wearing parts). As we can see, the drill is optional, the only equipment really necessary being the hacksaw, to cut the mosquito net to the right dimensions. Because it is indeed a cuttable model, which is therefore easy to adjust to your own needs.
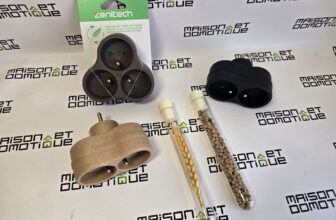
Inside, there are several elements: the box containing the roll-up mosquito net, two profiles, two instructions, and several bags of accessories.
This roll-up mosquito net for doors can in fact be installed in two different ways: if for my part I prefer installation without drilling, it is still entirely possible to fix it in the door frame by drilling and screwing. Two instructions are therefore provided depending on the type of installation desired: Likewise, two different accessory bags are provided depending on the type of fixing:The mosquito net is delivered in a powder-coated extruded aluminum box, which guarantees a very long lifespan. The mosquito net itself is made of high-end fiberglass fabric, tear-resistant and weather-resistant.
The end allows you to adjust the tension of the canvas if necessary

It is also accompanied by two powder-coated aluminum profiles, which will go at the top and bottom of the door. These profiles have anti-wind brushes, and will be used to guide the mosquito net when it is deployed:

These three elements can be easily cut to fit any door. So let's move on to the installation…

Installation of the roll-up mosquito net for the door

Installing the roller screen for doors requires little equipment if you're using a clamp-on installation (i.e., no drilling required). You'll need a tape measure, a felt-tip pen, a hacksaw, and ideally, a small file. A miter box will also allow for a straight cut, but it's not required.

In addition to the printed instructions, the manufacturer also provides a video explaining the step-by-step installation of this roller screen for doors:


;-)


We start by measuring the height and width of the door. Here, it's a very classic double-leaf French window, approximately 1.20m wide:
Subtract 13mm from the height measurement. Subtract 82mm from the width measurement. All that's left is to cut it out using the hacksaw:
And finish with a little file to deburr the scrap metal:
The same goes for the main box:
Be careful not to place the pieces directly on the ground to avoid damaging the paint. Here, I used the cardboard packaging to avoid any scratches. Once the pieces are cut, simply follow the instructions to add the necessary elements at each end: Here, I'm installing the end caps with a tightening screw that will allow the screen to be securely tightened between the French window frame. The Allen key needed for tightening is provided.
All that's left is to position everything on the French window frame. It needs to be at least 8cm deep. For me, it was perfect, because the screen needed to fit between the French window and the motor for my swing shutters, located at the very top, while also taking into account the cable routing for the motorization…

The installation itself is very simple: place the screen box vertically, to the left or right, depending on your preference. Here, I positioned it on the right, which better suits our usage. Then, insert the two profiles at the top and bottom, which will guide the screen when unrolling it.


Once in place, all that's left is to tighten each part with the Allen key. There's one screw on each profile, at the top and bottom, and two screws on the screen box.

When the assembly no longer moves and is securely tightened, it's finished! The roll-up screen door is installed! This doesn't require drilling, which will also be of great interest to all tenants!

If you really take your time, the installation can be completed in less than 45 minutes. And all this without drilling into the walls or the doorway!

The end result is a clean and discreet installation, as you can see on my French door:
A cream color would have been perfect, but white remains very discreet here, and personally, I don't find it offensive:


The roll-up screen door fits well between my French door and my shutter, without any problems, and the motorized arms don't force the screen even when it's left extended.

Roll-up screen door: in use

It's similar to the roll-up mosquito nets we've seen before, except this one is pulled horizontally. Simply pull it, here from left to right, and the screen automatically locks at the other end. It's a bit like a sliding door. To close it, simply pull it outward a little to unlock it, and it automatically rolls up. It couldn't be simpler! No more small creatures getting in, both flying and crawling, since the frame is perfectly closed!

We also appreciate the good light provided by this screen, which preserves all the brightness and visibility of the window:

With the screen deployed, the view remains very clear.
Be careful if you have a pet. Apparently, this screen is so clear that my dog didn't see it, and he seemed very panicked when he tried to get out and got caught in the screen… So I left a chair in front of the door as a precaution, just so he doesn't do it again and damage the screen. But it allowed me to see that it was resistant to a 32kg boxer :p
Despite this little incident, I have no complaints about this roll-up screen door, which is attractive, easy to install, and really practical in everyday life. It made our lives much easier this summer, and even more so in this month of September, which is still enjoying the heat. We can now leave the French window open to enjoy the fresh evening air, even with the light on: the critters can't get in anymore! In short, it's adopted, and we wonder how we ever managed without it until today! We're looking at a “premium” mosquito net, selling for €199. It's a bit pricey, but this net should last a few years! Nothing like the Velcro models we buy every year ;-) Note that with our code

DOMOMOUSTIK, however, it's still possible to get it for €183. A discount that's always worth taking!


Please remain courteous: a hello and a thank you cost nothing! We're here to exchange ideas in a constructive way. Trolls will be deleted.