
Solar energy storage is increasingly popular. One must say that the solutions are becoming smarter and easier to set up for anyone. Imagine this: a smart battery that stores energy from the sun during the day and supplies it back to you in the evening, when you need it most, all without doing anything! Last year, we had the chance to discover the Anker Solix Powerbank 2 solution. The energy storage specialist is back this time with a new model: the Anker Solarbank 2 E1600 AC. A little “AC” that makes all the difference. I was lucky enough to get my hands on this little marvel, and I was very curious to explore its possibilities. But enough chit-chat, let's dive into the heart of the matter and discover the new features brought by this Anker Solarbank 2 E1600 AC!
Unboxing the Anker Solarbank 2 E1600 AC Solution
The reception of the package was quite the experience, as I received the Anker Solarbank 2 E1600 AC along with an expansion battery to test all its functions.

At first glance, there's a sense of déjà vu: the solution is indeed very close to the Solarbank 2 Pro discovered a few months ago.

So, we find the main battery accompanied by all the essentials: power cable, MC4 cables for solar panels, fastening screws, and manual. As usual, the Anker package is very complete, and we appreciate it!


The aluminum casing gives it a robust and premium look. You can feel that this battery is made to last. The dimensions are reasonable (46 x 25 x 25 cm), allowing it to be installed without too much difficulty in a garage or a technical room, for example. Its weight of 22 kg and the handles on each side make it portable, even if that’s not its main purpose.

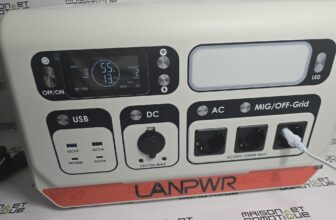
The various ports and connections are well-arranged and clearly labeled. Notably, there are two MC4 solar inputs on the left side:

A bidirectional AC outlet for connecting to the grid (at the top), and an additional AC outlet for directly connecting devices.

This latter is particularly well protected under a silicone flap, allowing it to fit any plug.

The whole is complemented by an LED display that shows information according to specific color bands.

Finally, let's not forget the connection port for the additional battery, located under the main battery:

You just need to remove two screws to take off the protective cover, thus giving access to the battery connector:

The expansion battery is very similar to the main battery, although it has no screen or outlets:

It indeed only has a battery connector on the top and bottom, allowing the batteries to be stacked to achieve a much more substantial capacity of 9.6 kWh.

The package also included the Anker SOLIX smart meter, a small discreet box that we had already seen in the previous test, which will play a crucial role in optimizing our setup.

In short, aesthetically, it's a flawless design for Anker. This Solarbank 2 E1600 AC looks great and exudes solid durability. Moreover, certified IP65, it's ready to face the weather challenges outside.
Installation of the Anker Solarbank 2 E1600 AC
If you have never installed this type of equipment, it may seem a bit daunting. But Anker provides a clear and detailed installation guide. No cryptic manual translated from Mandarin by a dyslexic intern, phew! The diagrams are precise and the steps well explained. Even a novice can find their way without too much difficulty.
The installation of the Anker Solarbank 2 E1600 AC occurs in several steps:
- Choosing the location: if you have a dry place sheltered from extreme temperature variations, like a garage or shelter, that's always welcome. As I like to test thoroughly, it spent part of the winter outside. The battery is certified IP65, so it's resistant to dust and water splashes. And it truly is the case :)
- Connecting the solar panels: If you already have panels, now is the time to connect them to the Solarbank. If not, Anker offers compatible panels (the famous RS50B at 540W). The connection is made via MC4 plugs, very easily: this standard ensures the plugs are well waterproofed and cannot be connected the wrong way. You can connect up to 1200W of solar panels here.

- Connecting to the electrical network: just plug the battery's plug into a domestic 230V outlet. A dedicated line is better, but not mandatory. You just need to ensure that there are no other power-hungry devices on the same line.
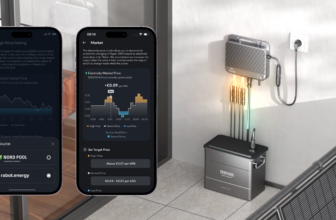
- Installing the smart meter: The small Anker SOLIX box is placed directly in your electrical panel. It will measure in real-time your energy consumption and production, thanks to a clamp placed around the phase of the electricity meter. The installation is fairly simple, but if you have doubts, don’t hesitate to call a professional. This is probably the trickiest step, as it requires opening the electrical panel.

- Configuring the system: This is where the magic happens. Via the Anker SOLIX app (available on iOS and Android), you can set up your system. The interface is intuitive and guides you step by step. In a few minutes, your Solarbank is operational and ready to optimize your energy consumption.

The entire process took me about an hour, taking my time and taking photos for the article.

Usage and Experience Feedback in Situations
That's it, the Anker Solarbank 2 E1600 AC is installed and configured. It's time to see what this little marvel can do!
We are very far from the early systems that only charged from solar power and returned everything blindly, without knowing the needs of the housing. The Solarbank, coupled with the Anker SOLIX meter, analyzes in real-time the production and consumption of energy. It then decides to store excess solar energy or to use it immediately according to the needs of the housing.
A concrete example: on a sunny day, my solar panels produce more than I consume. The Solarbank stores this surplus. In the evening, when I come home from work and I run the washing machine, stove, and TV, the battery automatically discharges to meet my needs, thus avoiding pulling from the electrical grid. Result: an electricity bill that melts away like snow in the sun! The system is particularly efficient, as a simple variation of less than 10W is accounted for in less than 3 seconds. This is extremely fast! In practice, this allows the battery to always inject the necessary energy into the housing with minimal loss (almost no energy sent into the street, and almost no electricity taken from the Enedis grid).

The Anker SOLIX app is a real pleasure to use. It allows you to monitor in real-time the production, consumption, and state of charge of the battery. It is even possible to schedule time slots to optimize the use of the stored energy. For example, I configured the system to prioritize the use of the battery during peak hours when electricity is most expensive.

The 3200Wh capacity of the Solarbank (here 1600Wh on the main battery + 1600Wh on the extension), coupled with 1100W of solar panels directly, and 800W via the AC plug, has proven sufficient to cover a good part of my daily needs. Of course, if you have a large family or an energy-hungry home, you can always add additional battery modules (up to 9600Wh in total).

A very appreciated feature in this new version is the ability to charge from the grid. Indeed, in previous versions, batteries only charged via solar panels. In the “AC” model, the battery can be charged from the grid up to 1200W. This is particularly useful in winter when the sun can sometimes be absent, or for those who, like me, subscribe to Tempo EDF: the day before a red day, it is possible to charge the batteries from the grid so that they release this energy during the very expensive red peak hours. Thus, no nasty surprises on the bill, while maintaining a completely normal lifestyle.

Another novelty in this version is its additional AC socket. We had already seen it on the previous version: in the event of a power outage, it allows us to connect our sensitive devices, such as a fridge or freezer, to keep them powered despite the power cut. This is very convenient, as many storage solutions become inoperative in case of a power outage. Thus, one might find themselves in the dark during a power cut while our batteries are full but unusable. Quite frustrating :/ But this is not the case here: by plugging an extension into this AC outlet, it is entirely possible to power sensitive devices (or not) even when there is a general power outage.
But that's not all: this outlet can accommodate the 230V plug of any micro-inverter. Do you already have a solar setup or a solar station on your terrace, like a SunFlower Solar station, Sunology, Beem, or anything else? You can connect it directly to the Anker Solarbank 2 E1600 AC without altering the existing setup. Instead of plugging the 230V plug of the micro-inverter into a wall socket, you simply plug it into the AC socket of the Solarbank. This can accept up to 1200W of power, which, when combined with the solar panels plugged into the MC4 ports, allows for up to 2400W input!

Over the weeks, I have noticed a significant reduction in my electricity bill. According to my calculations (and the valuable help of the app), I managed to save about 30% on my monthly consumption. That's not negligible! Indeed, with a classic solar installation, it is estimated that only 40% of the production is consumed, the rest being sent back to the street for free. With such a smart battery system, it is possible to reach 95% self-consumption, thus greatly optimizing the use of our solar production.
Of course, on very cloudy days or in winter, solar production is logically lower. In such cases, the Solarbank draws more from the grid to recharge (depending on the settings you specified, of course). But even under these conditions, the system remains effective and allows for savings by consuming electricity drawn during off-peak hours, during peak hours.
Conclusion
After several months of intensive use, the Anker Solarbank 2 E1600 AC proves to be a true intelligent energy management system that has transformed my way of consuming electricity.
The strengths are numerous: a relatively simple installation (provided you carefully follow the instructions), an intuitive and comprehensive app, intelligent energy management, and real savings on the electricity bill. Not to mention the sleek design that makes it almost a decorative item!
Of course, the initial investment may seem significant (count on approximately €1299 for the Solarbank 2 E1600 AC with the smart meter). But given the savings made and the announced lifespan (over 6000 charge cycles, equivalent to about 10 years of daily use), the game is clearly worth the candle.
In short, the Anker Solarbank 2 E1600 AC is much more than a gadget for trendy eco-freaks. It is a concrete and effective solution to reduce energy dependence, save money, and adopt a more sustainable lifestyle. If you're considering taking the plunge into solar self-consumption, this intelligent battery clearly deserves your attention.
Please remain courteous: a hello and a thank you cost nothing! We're here to exchange ideas in a constructive way. Trolls will be deleted.